Sunday, September 24, 2006

The Haunted Mine Tunnel

Every year the kids asked if this was a haunted house (that they could go in). Every year I had to say. "Sorry, no". Then I got this idea to make one. We had a narrow strip of yard at the top of the steps that lead to the side of the house where their was a huge covered porch. So, I cam up with this idea of building a tunnel. At the time, I was working on 'Sweating Bullets' (a.k.a. 'Home On The Range') and it inspired me to do a western themed "attraction".


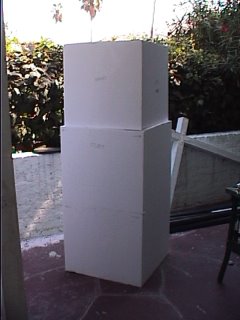
In the hat building, the one off of the 134 freeway) they had these production areas that used to serve as the hub for each show called POD's. At the entrance to these POD's, they would construct these huge monstrousities. It was llike entering a theme park attraction (They don't do any more, of course). Well. I was admiring the technique apllied on one of them and found out that someone form the ARL (Animation Resaerc Library) had made it. I made an appointment to meet with this person to discuss how he fabrictated this, etc. He was a really cool guy and happened to have pictures at his desk (like a brag book that one would have of their children). Anyways, I had told him what I wanted to do and he offered to help me buy creating the frame and doing a rough cut of the styrofoam. Here's what eventually came from that meeting:


Anyways...getting back to the tunnel, after learning how it was done, I made the entrance to the tunnel. The rest I used PVC pipe and plastic sheeting and a good thing, too because every year it rained and everything got wet. One year, I thought it wasn't going to rain and built the tunnel out of paper. I used the the stuff that you put down to protect floors
while doing construction. We crumbled it up then flattened it out again and the texture left from that crumbling looked like boulders-it was great! But alas, it rained just a few days before Halloween and I had to rush to reconstruct the tunnel again.

Before I go on, I got to give credit to my dedicated and true friends that helped every year to construct this thing and help set-up. It usually took a whole day, if not two! Thanks, guys!!!! Also, thanks to my brother in law for helping construct the "full attraction" soundtrack. I used clips from the hammer strikes from "Hi Ho, Hi Ho" (the Seven Dwarf's song) from 'Snow White', wind and crystal chimes from the Matterhorn, and thunder sfx from the Haunted Mansion. I also took area music from Frontierland and layerd thunder sfx over it-it sounded great! I got a lot of compliments on teh sound design. People asked where I got it. They were surprised to hear that it was from (the usually "cheery") Disneyland.

I decide to give it a story. It wasn't just any old rock mine, it was a "rock-candy" mine! At the end, I dresssed up like a prospector (with a big paper mache hat that I had made-I looked like "Yosemite Sam") and built a little mine cart to keep candy in. I also made cardboard standees of barrels of dynamite and a little cardboard detonator that was hooked up to strobe lights and a little thunder sfx box and I would pretend to blow up the mine as the kids left. (I wish I had pictures-I'm sure my friends with digital cameras do. I'll have to bug them about it).


I remember one year, I had so much hooked up and a fuse blew. All the lights went out and everyone cheered-they thought it was part of the show. Meanwhile, I'm running around with a falshlight trying to find the circuit breaker.

Adults would come up and I'd offer them candy. They declined and said that they just came up to see the show (and even applauded one time). One kid actually had the gall to say that they liked it better last year. ("Everyone's a critic.")

Yes, Halloween was great. That was before kids. Now, it's a whole different experience-but just as rewarding if not more so!

I keep thinking that until they turn 13, my kids will think that I'm the coolest dad but after that, I can just hear, "Dad, your not going to put out the Halloween stuff out again this year are you? My friends will see."

Here's a video "Ride-through" of the mine tunnel that I built for 2003:


...and here's the "new and improved" tunnel built the following year (2004):

The Old House

Here are some pictures of the house that we used to live in (I refer to it as "the old house").


You may notice in one of the pictures a Real Estate sign and some characters. That's for another post. The Real Estate sign was a gag that has a funny story to it. But here you can also see some tombstones that I had made with plywood. They were so heavy! And I had to carry them up and down that hill every year. Plus I was nervous about the kids running up and down the steps. I thought they wouldn't actually climb all the way up but they did.The house to stop traffic. There would be a huge pile up of cars for at least a block in each direction. Mini vans full of kids would drive up, the door would open the kids would pile out runn up the stairs, get their candy, run back down and off they would go. Funny, the kids didn't really seem to care about the decorations but the parents would linger,take pictures and ask questions, etc. Halloween was fun (and still is)!

Saturday, September 23, 2006

The Hatbox Ghost

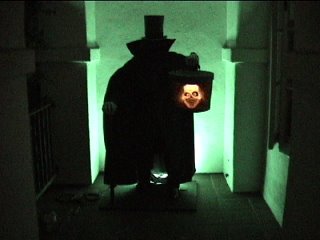
For those that don't know (and for good reason-beacause they're not geeks like me and have a life-whatever...) there was a character in the Disneyland Haunted Mansion when it first opended up called the Hatbpx Ghost. It was nearby wear the bride (with the beating heart) currently is now in the attic. For some reason, mostly because th effect didn't totally work, they removed it from the attraction (not "the ride"-the "attraction"!). Well. it has created lots of talk by haunted Mansion fans alike.

Here's a picture of the actual Hatbox Ghost from the attraction:


So I decided one day to make one!

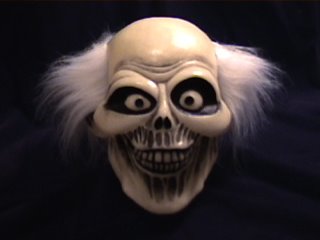
I gotta tell you this story....So, I make this skull from a photo in 'The 'E-ticket' fanzine out of Sculpey.


I want to make a transluscent, hollow cast from it. I look in the phone book under model makers, etc. and call around asking if they can do it. Most of them say that they could but I would have to order/make hundreds of them to make it worth their time. "But I only need two", I said. Finally I got in contact with someone who said "bring it by, we'll take a look at it." I did. and tis gu lokked at it and said,"You know where you need to go? There's a place about a mle from here. You go up the street, make left, over the train tracks and then make a right. You go about 3-4 blocks. There'll be a big billboard sign. There shop is under it." "Could you be any more vague", I said. So, I hopped back in the car and folowed his "directions" and miraculously, I found it!!! It happened to be lunch time and the crew were at the lunch truck. I took my ghost head (in a plastic bag, and asked one of them if they knew someone that could help me. They didn't speak english but they summoned me to follow them into the warehouse building. I could tell that I was at the right place based upon all the creatures and Halloween products. They sat me inan office and told me to wait here. A few moments later, a guy walks in and I tell heim what I need. I take out my ghost head and he recognized it right away. He agreed to make a mold and cast. Long story made short, we eventually became good friends.

So, here's how it turned out. I made a solid fugure and hatbox and put a mylon "scrimm" over both heads. I also place a light behind the figure to plunge it into silhouette which made it harder to see the heads. It was a cool effect.


The Staring Statues

First I made sculptures out of Sculpey modeling clay. The busts measure 17" tall by about 8" wide.


Then, I had a friend of a friend, use a vacuum-form machine to make the positive/negative form. The process basically works by taking a thin, hetaed sheet of plastic, draping it over the sculpture then placing it on a machine-table that has a whole bunch of tiny holes in it that's connected to a igh-poered vacuum. It sucks the air down causing the heated plastic to form around and in the shape of the sculpture. My friend had to re-cast my Sculpey models in plaster because the pressure of the vacuum would crush them to pieces. They power on the machine used wasn't great do it didn't quite capture all of the detail I put in but enough to make an impression.

The effect is basically that the busts seem to turn to follow the viewer's every movement.

Here's a photo of how the effect basically works from "behind the scenes". The viewer is actually looking at the bust/face from the reverse side. A light is placed on the other side to help light and see the details. I seem to remeber reading somewhere that the Disney imagineers discovered the effect while making cast for the 'Great Momemts with Mr. Lincoln' show.


Here's what they look like (using a Night-vison on my video camera).

How I made the Bat stanchions

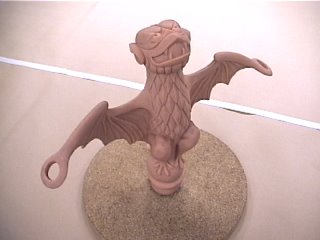
First I sculpted the bat out of sculpey. For reference, I took my video camera with Night vision into the Haunted Mansion at Disneyland and took video capturing the details in close-up-so scaled 1-to-1/actual size and it's pretty close to being "on-model" as they say in my biz.)


Then I took it to a friend who helped me make a mold out of silicon (which captures every single detail-even fingerprints! That's how accurate it is!)


When they came out, they turned out great! They were made to fit onto a standard size PVC pipe. The Halloween that I made these, I was in a hurry. They were finished literally the night before Halloween. My friend showed up with them and I thought they were going to be cast in a hard resin but because of time (again) he only had time to have them cast in self-skinning foam (like a NERF footbal, etc.) I tried mounting them onto the PVC but as soon as I connected a chain between them, they slumped over because they didn't have enough strength. So I had to stick a metal pole inside of them to give them a frame/structure (the wings still sag, though).

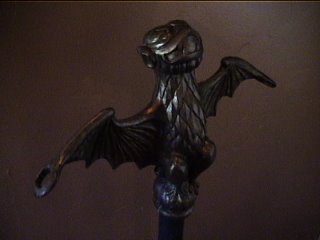
I also faux-finished them to look like brass by first painting them with a base coat of black paint then dabbing a gold color over the black. (people think they are for real until they touch them.)

Here's the finished product.


Friday, September 22, 2006

How I made the columns

First I made a "box" out of 1"x 3" wood and doorskin (thin plywood) materials. Then I glued 2" think styrofoam on to the box.


Then I shaped it using a grated wood-shaving tool that I got fom the hardware store. the handle was made of plastic with a metal grate-costing about a couple of bucks.


Then I took a hot knife to it to make the cracks. I then took some black paint and painted teh cracks first then I painted the the face of the columns with a base coat of solid color. I then used a spray "stone" texture (that yu can get at the hardware store nowadays) over he base coat.


So, here is my house at Halloween. The columns I had made from plywood and styrofoam. Originally I had panied them gray qith stone texture but when we moved to the new house, the color didn't match. So, I found some leftover paint in the garage and painted it. (There are also 5 "mini-pillars" connected by styrofoam chains that aren't in the picture-I post more/better pictures later.)

I like the turret on the house-it gives a "castle-like" quality. The pumkins are the cheap hollow styrofoam ones that you get from the craft stores and if you notice, those are the bat stanchions from the 'Haunted Mansion'. I sculpted and made them myslef (with the help of a frind who made the mold and castings-Thanks, Chad!)

Just wait until you see my home office....