Every year, we make our own Christmas cards. We try to summarize the past year in one single image. My wife comes up with the ideas and I draw them up then I pass them in front of her in a vendor/client relationship. I get revisions (usually on how I draw my wife and her hair) and have to turn them around quickly. Don't ask me how but somehow we mange to come up with a concept, write a letter get them out before Christmas.
Also, every year that I see a CG film (in 3D) doing really well at the box, I have to wonder if anyone appreciates anything that's hand-drawn or crafted anymore. I keep thinking to model my family in the computer and do a lifeless CG Christmas card (and include 3d glasses) but our friends say how much they love our cards and the hand-drawn aspect of it and it gives me hope to carry on.
1996- It was the year my wife (then girlfriend) and I first met and we got a dog. This was before Photoshop. I would draw it in pencil, xerox it, color it in Prismacolor markers, color copy it (at work), cut it out and slip it into a photo greeting card.
Somehow we skipped 1997...
1998- It was the year I took up golf and we got engaged.
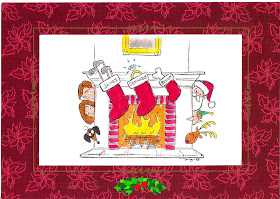
We skipped 1999...we were married earlier that year (I guess we were "honeymooning")...
2000- It was the year of the election between Bush and Gore in which there had a to be a recount because of Florida's faulty voting process and the "hanging chad" on the ballots. (It was Christmas and we still didn't know who was going to be president...or at least the Democrats didn't).
2002- Our first child was born and all we could worry about was making sure the baby stayed sleep! (Note: our jealous dog)
2003- Our daughter was almott one and she was saying her first words. We also had to put our dog to sleep (due to a broken back) earlier that year on Halloween of all days!
2004-Our daughter was 2 years old and talking in full sentences. (The situation depicted actually happened!)
2005-My wife was pregnant with our second child.
2006- I wanted a dog, my wife wanted a night out, my oldest wanted a bike, and all my youngest wanted for Christmas was her "two front teeth"!
2007-The girls were really into ballet and I was making an editorial comment on technology vs. traditional methods.
2008-Despite that, I discovered Photoshop! No more second generation copies for our cards-adjusting color copy settings, etc. I could print directly from an image file. My youngest (age 2) was also talking full sentences.
2009-Disney's 'The Princess and the Frog' just came out and my oldest was reading at an advanced level.
2010- Our kids were flower girls in my sister's wedding. My wife and I turned 40 and everything's going A-okay!
HAPPY HOLIDAYS EVERYONE!!!
Home
▼
Friday, December 24, 2010
Saturday, December 11, 2010
ROTTEN APPLE 907 presents 'HOLIDAY NIGHTMARE'
Well, my friends at at it again!
They've set up a walk-through Christmas display based on Tim Burton's 'The Nightmare Before Christmas'.
One Staurday morning (about 2 weeks before Christmas) I get an "emergency" email form my friend Jason asking if I can help put up their display. It turns out that their neighbor, who is like a "Mrs. Kravitz" from 'Bewitched' called the city on them (as she does EVERY year). Originally, they had approval in the form of a permit from the fire marshal, the mayor and the neighbors to leave up their museum haunt through the holidays to double as their Nightmare Before Christmas display but because of a complicated set of politics between city officials and the fire marshall, the fire marshall made them take the whole thing down and start over. So, I helped them put up walls.
Here is the exterior. It would have been twice as large but since they had to start over, they only would have tome to put up half of it. It would have been an incredible display but still, impressive none-the-less!
This is the exterior meant to be the town hall from Halloween town:
Here's the detail above the door:
You would enter Halloween town and be greeted pumpkins singing "This Is Halloween":
Then you'd see the Pumpkin King:
You'd also see Jack's plans for Christmas:
Then, you'd enter a hallway with presents and a pop-up jack-o-lantern...
...leading to "Making Christmas"
(on the right, you can see one of the "Cast Members" dressed as the "clown with the tear-away face" holding a present. The present was on a...what do you call those things... that would extend out at you.)
The attraction would not be complete with "oogie Boogie"!
Here's me and my friend Jason along with good 'ol St. Nick:
A few blocks away, there were some other incredible Christmas/light displays:
(I like the "Ditto" on the neighbors roof.)
Thursday, November 18, 2010
Ludwig Von Drake
Probably my favorite Disney character of all time is Ludwig Von Drake! I always wanted a chance to get to animate him and fiinally I did! It was for promotion for the Walt Disney World Resort in 3D.
A while back, My friend Bert was approached to do produce a short scene with Ludwig. The only catch was we had to have a finsihed scene in color within 3 weeks! Bert is quite an amazing producer and animation director. He's knows how to get the job done through knowing who to get, coordination & scheduling. He figured the best way to get this done was to layout the entire scene with poses, get the poses approved, then split the scene up between 3 animators (sounds crazy, huh?). He also figured out good spots for which to make the switch (usually between broad actions).
My friend Sandro Cleuzo did the first third of the animation, Bert did the middle part "...brilliant things..." and I laid out the entire scene and animated the last part where he points at the camera and pulls the screen down.
Anyways, here's how it turned out:
Saturday, November 13, 2010
Halloween 2010- The Haunted Museum
People would ask "So, what are you doing new this year?" I'd answer, "Nothing...to my house...BUT...I'm helping these friends of mine with their haunted house."
I helped them last year (see post) with their haunt and I was honored to be asked to help out again this year on the 20th Anniversary of their haunting!
HOW DID YOU MEET?
I never told the story of how we met. Basically, this couple found me through a friend and asked if they could borrow my Halloween decorations for their Haunted Mansion-themed wedding. It turns out he worked for Disney, too so we were practically like family). Anyways, they offered me money to rent them but I declined and said as long as they are willing to haul it out and back and return in undamaged, they're welcome to it! They were grateful and in exchange, they offered their talent and expertise to fix-up my stuff (which was in desperate need of repair!)
They had their wedding and returned my stuff back better than new! They made a new lightweight casting of an arm and rigged up a motor to the arm in the crypt so now it moves again...they made bases for my characters to stand so I wouldn't have to prop them up with lawn stakes..they also made castings of my staring statue/busts and gargoyle/bat stanchions
Anyways...flash forward one year...*ZSCHWAP!*...they asked if I would help them out again this year and invited me to their parent/in-laws house to do some sketching out of ideas. They wanted to do a "haunted museum" (instead of 'Night at the Museum', it would be 'NightMARE at the Museum'.)
Enough explanation...I WANNA SEE PICTURES!
They gave me some reference from which to draw from and I sketched out these drawings for the exterior...
From those I then created the poster/flyer advertising the haunt:
This is what the exterior of the building ended up looking like:
I then collected a series of reference material for them and put sheets together that looked like this:
I also did various sketches of what the rooms would look like as well as possible gags to scare people.
It was alot of fun, almost like doing visual development for a film or maybe even for a Disneyland theme-park attraction. It was like working for Imagineering but on a smaller scale, but when you look at the end result, it easily could have been one of theirs.
I also put together these banners to be made and placed on the exterior of the building:
This year, I thought it would be good to try some projection. They wanted egyptian scarabs (beetles) to be cawling on the wall. So, I took an image I found on the internet of a stag beetle, animated legs on it doing a "walk-cycle", then my friend multiplied it and came up with this (Note: this is a low-res version of the scene):
With the theme of a haunted museum in which the exhibits come to life, one of the rooms was a storage room in which one of the crates had opened and revealed that one of them stored the Ark of the Covenant (from 'Raiders of the Lost Ark').
We wanted to do projection of the angels coming out of the ark on a screen of mist/fog (like the Davey Jones effect in the Pirates of the Caribbean ride at Disneyland) but it didn't work out but here is some of the development I did on it:
MORE TO COME...
Monday, November 01, 2010
Dia De Los Muertos
With today (Nov. 1st) being Dia De Los Muertos (Day Of The Dead), I'd thought I'd share some artwork I did for an animated project about the Mexican heritage holiday.
Wednesday, October 20, 2010
Pumpkin Patch
I volunteer at my daughter's elementary school by joining the school's Foundation. I served as president of the Foundation for the past three years. Last year, we held our first annual Pumpkin Patch at the school. We sold 200 pumpkins. We also had a Bubble-Fogger machine which was a big hit. The Kindergarten kids were chanting from behind the chain link fence as we were setting up, 'HALLOWEEN! HALLOWEEN! HALLOWEEN!!!"
This year, we're doing it again!
You're welcome to come on by and support R.D. White Elementary school at 744 E. Doran Street in Glendale.
Here are the flyers that I made for the event(s):
2009 Pumpkin Patch flyer
Here's last year's sign that I painted (the kids helped, too):
After the event, I kept it outside in my backyard and it rained. I didn't want to go through the trouble this year to make a new one so I decided to have a 3' x 8' banner made that'll look something like this:
Tuesday, October 19, 2010
The Ark of the Covenant - Cherubim
So I'm working on this haunted house walk-through attraction with some friends called 'Nightmare at the Museum' in which the exhibits come to life. In one of the rooms, is the storage room in which a crate has fallen and broken open to reveal that it encased the Ark of the Covenant (from 'Raiders of the Lost Ark'). My friends wanted to build one but needed someone to make the cherubim on top. I remember those cherubs from the movie and the design facinated me. I always thought it would be fun to have a set of those to put up on my desk so I volunteered to do it.
We did some online research. There are many depictions of the cherubs as you can see here:
I noticed that they all are pretty similar in concept. That's because in the Bible it actually describes how the Ark was to be constructed (even to the exact measurements!). It was to be a box made of wood and plated in gold. On top of the box was the cover or "Mercy Seat". Two cherubs made of gold were to be on either end facing each other with their wings outstretched and touching. You can read all about it here.
The most popular version is the one from 'Raiders of the Lost Ark' so that's what we decided to make.
We found a few sites that had detailed pictures and schematics on how to build your own Ark of the Covenant replicated prop from the movie. Here's is some of that reference material:
(oooookay....I'll keep that in mind...)
so here's mine....(granted, I know it not EXACT. Even with all the reference, it was still hard to see the full detail so I had to take a few liberties and while I was at it, I might as well do it to how I wanted to see it. Its been awhile since I sculpted - maybe even YEARS! When I added up the time spent to make this, it took me about 3 - 4 eight-hour days.)
I set up in the dining room which made my wife a little concerned. (she does that groan that Marge Simpson makes about Homer.) This way, I can be near the kids and feel like part of the family. The kids took over a box of clay and had fun using the pasta maker (which I use to help knead and soften the clay to make it workable).
First, I blew up an image of the cherub to size. Then made a wire armature to match. Then I slapped some clay on, roughing out the forms. This process took about 8 hours.
(if you look closely, you can see a toy box that looks like the Ark. My kids asked, "Can we put candy in there?")
Then I started refining the shapes and adding detail:
The hardest part was sculpting that tiny face. As you can see it was about the size of a quarter. Originally, I tried sculpting it by trying to work my fingers between the wood and wings--this proved to be a useless waste f time. Then, I got this idea to sculpt the face , bake it then squeeze it into the main sculpture. "BRILLIANT!" , I tell you.
As I was sculpting it, I was thinking, "Why am I spending so much time on something no one will see?" Then I thought 1) because I know people will want to look on the underside and expect to see something there and 2.) because I'll know! I'm creating art--I have to feel good about it.
I swear, I could have gone on forever finessing this piece, smoothening it out, taking out pocks and finger prints, etc. until finally I just had to call it "done". At times, it's fair enough to say, "This was my best effort and what I was able to do in the time given."
Now its up to my friend to make mold an cast it up!